
You step into the shower on a cold morning, turn the handle all the way to hot, and get a blast of lukewarm water instead. Maybe it takes a long time for hot water to arrive, or it runs cold halfway through a shower. In that moment, you do not care about technical jargon. You just want to know if there is a simple, safe fix you can try before rearranging your day around a service visit.
For many homeowners, that instinct to check a few things first is smart, as long as you know where the safe line is. Some water heater problems really are minor, like a bumped thermostat dial or a tripped breaker. Others point to serious gas, electrical, or pressure issues that should not be handled with DIY experiments. Knowing the difference can protect both your budget and your home.
At Wolcott, we have been working on water heaters in Portland-area homes and businesses since 1978. Over those decades we have seen the same patterns again and again, from simple fixes anyone can check to failures that need a trained technician. This guide shares the same basic DIY water heater troubleshooting steps we walk through on real calls, along with clear warnings about when to shut things down and call our team.
Start With Safety: When DIY Water Heater Troubleshooting Is & Is Not OK
Before touching a water heater, it helps to draw a clear line between what is reasonable for a homeowner and what crosses into professional territory. A typical tank water heater sits at the intersection of plumbing, gas or electrical power, and sometimes combustion venting. Simple checks like looking at a thermostat setting or confirming that a breaker is on are generally fine. Opening up gas lines or working around live electrical connections is not.
If you have a gas water heater, treat any gas odor as an immediate stop sign. Do not try to relight anything if you smell gas near the heater or in the room. Leave the area, avoid turning electrical switches on or off, and contact your gas utility or an emergency technician. For electric units, never remove access panels unless you have already shut off power at the breaker and verified that the right circuit is off. Standing water near the base of an electric heater, especially around electrical components, is another reason to back away and call for help.
There are other red flags where DIY should end quickly. Active leaks from the tank body, not just a damp fitting or valve, often mean the tank is failing. Scorch marks, melted plastic, or burned wiring anywhere on or near the heater are signs of serious overheating or electrical arcing. A temperature and pressure relief valve that is constantly discharging hot water is another warning that things are not operating safely. Those are not situations to diagnose with trial and error. They call for a technician who can test safely and repair or isolate the unit.
Manufacturers and local codes anticipate that certain work will be done by qualified pros, especially anything involving gas piping, venting, or internal electrical components. Safe DIY water heater troubleshooting focuses on observation, simple setting checks, and very basic actions that line up with manufacturer instructions. As a plumbing, HVAC, and electrical company serving Portland for nearly 50 years, we take that line seriously on every job, and this guide will keep you on the safe side of it.
Know Your System: Gas vs. Electric & How Water Heaters Work
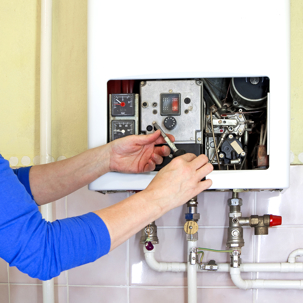
Useful troubleshooting starts with knowing what you are looking at. In many homes with tank-style heaters, you will have either a gas unit or an electric one. A gas water heater connects to a gas line and has a vent, usually a metal flue pipe, that carries combustion gases out of the home. You will see a gas shutoff valve on the supply line and typically a burner access cover near the bottom. An electric water heater connects to your electrical panel with a dedicated circuit and has no vent pipe. Instead, it has one or two rectangular access panels on the tank where the heating elements and thermostats sit behind insulation.
Inside both types, the basic layout is similar. Cold water enters near the top and is directed down a dip tube so it mixes at the bottom, where heating happens. A thermostat senses water temperature and tells the heat source when to cycle on and off. In gas units, that heat source is a burner under the tank, fed by gas that is controlled by a gas valve. Many gas heaters rely on a pilot flame and a safety device such as a thermocouple or thermopile that proves the flame is present. Electric units use one or two electric heating elements inside the tank that warm the surrounding water when energized.
Two other components matter for troubleshooting. The anode rod is a metal rod inside the tank that sacrifices itself to corrosion so the tank walls last longer. Over the years that rod dissolves, and once it is gone, the tank metal starts to rust. The temperature and pressure relief valve, often called the T and P valve, protects the tank from excessive pressure. If temperature or pressure inside the tank climbs too high, the valve opens to discharge water, which prevents dangerous buildup.
We see a mix of older water heaters tucked into cool basements and newer models packed into small closets or garages. Basement units may run for years with little attention, quietly building up sediment at the bottom from minerals in the water. Closet units often run warmer and may be set higher than needed to keep up with demand. Understanding which style you have, and where it sits in the house, helps explain some of the problems you might be seeing.
No Hot Water At All? Simple Checks Before You Call
Finding no hot water at all in the house tends to feel urgent. The good news is that some root causes are simple enough to check quickly. For an electric water heater, start by confirming that the breaker labeled for the water heater in your electrical panel is fully in the “on” position. Sometimes a power surge or element fault can trip the breaker. If the breaker is off or halfway between positions, switch it fully off, then on once. If it trips again immediately, stop there and call a technician, because repeated tripping points to a deeper electrical or element problem.
On a gas water heater, take a look at the gas shutoff valve on the gas line near the unit. It should be aligned with the pipe to be open. If it is turned so the handle crosses the pipe, it is closed and the burner will not get gas. Only adjust this valve if you do not smell gas. After confirming the gas supply, look for the status indicator on the gas control or a sight glass to see the pilot area. Many newer units have a small viewing window where you can see if a pilot is burning or if an electronic ignition is trying to light.
The thermostat control is another quick thing to check. On gas units, there is often a temperature dial or knob on the gas valve with markings such as “low,” “hot,” and “very hot,” or degrees. Someone may have turned it down during warm weather or while away. Gently turn it toward a normal range, often around 120 degrees Fahrenheit, and then give the heater time to respond. On electric units, thermostats typically sit behind the access panels, which should only be opened with power shut off at the breaker, so this is an area where many homeowners choose to call in a pro.
If you have confirmed power or gas supply and reasonable thermostat settings, but the water remains cold, the underlying issue is often a failed heating element in an electric heater or a problem with the gas valve, pilot system, or burner in a gas heater. Those are not DIY repairs. At that point, calling Wolcott makes sense. The steps you have already taken match the first checks our technicians complete on a no-hot-water call, and we then move on to electrical tests, gas pressure checks, and component diagnostics that require tools and training.
Water Not Hot Enough or Running Out Fast? Check These Common Issues
Lukewarm water or hot water that runs out quickly can be just as frustrating as no hot water, but the likely causes are a bit different. Start by confirming the thermostat setting on the heater itself. If a guest, child, or previous owner dialed it down to a very low setting, you may simply be asking the heater to produce more heat than it has been told to. For gas units, turning the dial toward a moderate setting and then testing a fixture after the tank has time to recover can make an immediate difference.
Changes in household demand also matter. If you recently added family members, installed a large soaking tub, or started running the dishwasher more often, you may be outpacing a tank that used to be adequate. In that case, even a properly working heater will seem to run out of hot water too soon because the tank volume and recovery rate are too small for the new usage pattern. Testing by staggering showers and hot water appliance use for a day can help you see whether timing alone affects performance.
Sediment buildup inside the tank is another common culprit, especially in older homes where the water heater has not been flushed regularly. Minerals in the water tend to settle at the bottom of the tank, forming a layer that insulates the water from the burner or lower heating element. As that layer grows, the effective capacity of the tank shrinks, and the heater has to work harder and longer to reach the same temperature. The result can be cooler water at the tap or water that turns cold more quickly.
You can sometimes get a clue about sediment by listening carefully while the heater is firing. Rumbling or popping sounds from the tank often point to water trapped in those mineral layers, turning to steam and collapsing. If you hear that kind of noise along with poor hot water performance, sediment is a likely factor. Some homeowners feel comfortable doing a light drain from the bottom valve to remove a little debris, but full flushing is easy to do incorrectly and can damage old valves or stir up problems. Many homeowners prefer to have a technician from Wolcott handle flushing as part of annual maintenance so it is done safely and thoroughly.
Rumbling, Popping, or Other Noises: What Your Water Heater Is Telling You
Unusual noises from a water heater can be alarming. Many people worry that sounds mean the tank is about to fail catastrophically. In reality, certain noises are very common signs of sediment and trapped air, while others do deserve urgent attention. Learning to tell them apart can lower your stress and help you decide on the right response.
Rumbling or gravelly noises while the burner is on, or while an electric element cycles, often indicate sediment. As heat rises from the bottom, small pockets of water trapped in the mineral layer flash into steam. Those bubbles push through the sediment and collapse back into water, which creates that rumbling sound against the metal tank. This wastes energy, because the heater has to work harder to push heat through the buildup, and it can stress the tank over time, but it is typically not an emergency in the moment.
Popping sounds can be similar, sometimes more distinct and intermittent. They also point toward expanding and collapsing pockets of water and steam in sediment layers. Hissing or sizzling around the base or at the side panels can have a different meaning. If you see or hear hissing where water is contacting hot metal or heating elements, especially near visible moisture, it may signal a small leak or failing element. In those cases, do not ignore the sound, because small leaks can become bigger and can affect electrical components.
Loud banging or knocking in the plumbing lines when the water heater cycles may be related to pressure changes or a condition sometimes called water hammer, where fast-moving water stops or changes direction suddenly and hits the pipe walls. While this is more of a whole-plumbing issue than a tank-specific one, it still merits a look from a technician. At Wolcott, we regularly respond to calls from homeowners worried about noises. We inspect for sediment, check pressure and relief valve operation, and look for any signs of structural stress so we can recommend cleaning, adjustments, or replacement if the tank is near the end of its life.
Leaks, Rust, & Discolored Water: Signs Your Water Heater May Be Near the End
Water on or around the heater is one of the clearest signals that DIY troubleshooting might give way to larger decisions. Not all moisture means the tank itself is shot, but it always deserves attention. A small drip from a drain valve or a slightly damp connection on a hot or cold line may point to a fitting or valve issue that is repairable. The temperature and pressure relief valve has a discharge pipe, often down the side of the tank. Occasional brief discharge may be normal in some operating conditions, but repeated or constant dripping suggests pressure or temperature problems that require a technician’s evaluation.
Leaks that appear to come from the body of the tank, especially around the bottom seam or where there is visible rust, are a different story. Inside the tank, the anode rod is designed to attract corrosion first, protecting the steel walls. Over years of service, that rod is slowly consumed. Once it is gone, the tank metal becomes the next target. Corrosion eventually creates thin spots and pinholes that start to seep water. By the time you see rust stains or water emerging from the shell of the tank, internal damage is usually advanced, and replacement is generally the practical solution.
Rusty or discolored hot water can also be a sign of tank corrosion. If only the hot water, not the cold, has a brownish or rusty tint, especially after the heater has been idle for a while, the inside of the tank or the hot water piping may be deteriorating. In some homes with older galvanized piping, discoloration can originate in the pipes themselves. However, when combined with an aging water heater, visible rust on the tank, or leaks at the base, discolored water is another cue that the heater may be nearing the end of its service life.
Repeated lifting of the relief valve lever to stop a leak or ignoring a slow drip can be tempting in a busy household, but it is not a long-term fix. A relief valve that is constantly opening may be responding to excessive pressure or temperature in the system. Those conditions can stress the tank and other plumbing components. Our technicians at Wolcott routinely evaluate heaters in this condition, check operating pressures, inspect anode rods and tank integrity when possible, and give clear, upfront advice about whether repair is reasonable or if replacement is the safer, more economical choice. Our goal is straightforward solutions, not automatic replacement recommendations.
DIY Water Heater Maintenance You Can Handle Safely
Once you have worked through basic troubleshooting, a little ongoing attention can help your water heater run more reliably. Some of the most effective maintenance steps do not require tools at all. Keeping the area around the heater clear of boxes, paint cans, and debris helps ensure good airflow for gas units and makes it easier to spot any developing leaks. Taking a quick look at the tank and connections every month or two for signs of moisture, rust, or scorch marks can catch issues early, long before they turn into emergencies.
Checking the temperature setting is another simple habit with real benefits. Many households are comfortable around 120 degrees Fahrenheit, which is often a good balance of comfort, scald protection, and efficiency. If the thermostat is set significantly higher, you may be using more energy than needed and putting more stress on the tank and piping. If it is set very low, you may experience lukewarm water even when everything else is working properly. Making careful, small adjustments and observing the result is a safe step for most homeowners, especially on gas units with external dials.
Some homeowners consider draining a small amount of water from the tank once or twice a year to help reduce sediment. On a relatively new tank with a good-quality drain valve, opening the valve briefly with the heater off and a hose or bucket in place can release some debris. However, on older heaters, valves can be brittle, and aggressive flushing attempts can stir up sediment that clogs fixtures or causes leaks at the valve. If you are unsure about the age or condition of your heater, or you have never flushed it before, it is often wiser to have a technician perform a controlled flush as part of a maintenance visit.
Professional maintenance covers items that most homeowners cannot safely check or adjust. That includes testing electrical elements and thermostats with proper instruments, checking gas combustion and venting, inspecting anode rod condition when accessible, and verifying that the relief valve operates correctly. As a family-owned company providing plumbing, HVAC, and electrical services in Portland since 1978, Wolcott treats maintenance as a way to protect your home for the long term, not just as a quick service call. Many problems we see on emergency visits could have been caught and addressed during a routine tune-up.
When DIY Troubleshooting Ends, How Wolcott Gets Hot Water Flowing Again
After you have checked power or gas supply, verified thermostat settings, listened for sediment noises, and looked for leaks or rust, it is reasonable to stop and hand things off. If the water is still cold, the pilot keeps going out, the breaker will not stay on, or you are seeing any of the red flags described earlier, the safest and most efficient next step is a professional visit. You have already done the right kind of DIY water heater troubleshooting, and there is no benefit in pushing deeper into gas controls or wiring without training and tools.
When you call Wolcott, our technicians build on what you have observed. A typical water heater visit includes confirming your findings, running electrical or gas pressure tests, checking thermostats and elements or burners, and inspecting for sediment, corrosion, and proper venting. We then explain what we find in plain language and lay out your options. Sometimes that means a straightforward repair, such as replacing a failed element, sensor, or valve. In other cases, especially with older tanks showing leaks or heavy corrosion, we talk frankly about replacement, using upfront pricing so you know the cost before work begins.
Because we provide plumbing, HVAC, and electrical services under one roof, we can handle the full scope of water heater work in Portland homes, from tank replacements and recirculation line adjustments to electrical upgrades needed for newer models. For urgent situations like active leaks near electrical parts or total loss of hot water for a household with vulnerable family members, we offer 24/7 emergency availability and same-day service when possible. If replacement is the right path and budget is a concern, we can also discuss flexible financing options so you are not forced to choose between comfort and financial strain.
Hot water is something you rely on every day, and losing it is stressful. With a few safe DIY checks and a clear sense of where to stop, you can quickly decide whether the solution is as simple as a thermostat adjustment or as involved as a new water heater. When it is time for a professional to step in, our team at Wolcott is ready to bring nearly 50 years of Portland experience, straightforward communication, and reliable service to your home.